Post Visibility Settings
Once you publish a WordPress post (or Page), it is visible to the public (by default). In WordPress terms, this means a post with a Published status has a default visibility of Public, based on the settings in the Publish box of a Edit Post Screen .
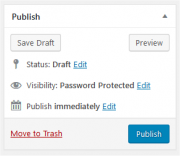
WordPress also offers two less public options for your post's Content Visibility . Clicking the "Edit" link next to Visibility: Public reveals three radio buttons:
When you're done editing the post's visibility, click the "OK" button. You should now see your post's new setting, e.g., Visibility: Password Protected. Remember: a setting change does not take effect until you click the "Publish" button (or "Update" if the post is already published.)
Finding or Changing a Password
Only an Administrator, Editor, or the post's Author can change a post's password or visibility setting. To do so, use the "Visibility: Edit" link again. These settings are also available using the post's Quick Edit link in the All Posts Screen.
The Visibility "Edit" link (or "Quick Edit") is also a good way to reveal a forgotten post password.
Password Protected Posts
So, a password-protected post with a title of "My Post" would display like this: 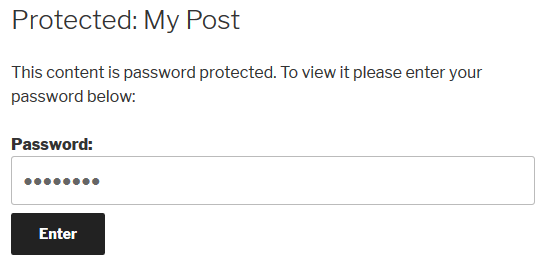
WordPress stores this password in a browser cookie so readers don't have to re-enter passwords if they visit the same page multiple times. Furthermore, if multiple posts use the same password, the reader will only have to enter the password once to access every post (see caveat below).
WordPress will only track one password at a time. Therefore, if two posts use two different passwords, entering the password for post A, then entering the password for post B means that revisiting post A (or any post which shares its password) will require the user to re-enter the password for post A.
Protect Custom Fields
WordPress does not print a password-protected post's Content or Excerpt until the correct password is entered. But a post's Custom Field(s) data is not protected, and can still show. To stop CFs from printing, wrap your get_post_meta calls (e.g., in single.php or page.php) with a conditional statement using: post_password_required . This one WordPress function checks both whether your post requires a password and whether the correct password has been provided:
<?php
if ( ! post_password_required() ) {
    // Code to fetch and print CFs, such as:
    $key_1_value_1 = get_post_meta( $post->ID, 'key_1', true );
        echo $key_1_value_1;
}
?>
The post_password_required function within in an if statement is also handy for other customizations, such as preventing password-protected posts from displaying in a list.
Customize the Protected Text
With WordPress Filters you can: change the default text in the password form, change the default text for the password-protected post Excerpt, and insert the password form into the post Excerpt. To do so, add the following code to your custom plugin file.
The password form displays this default message: "This post is password protected. To view it please enter your password below:" The following code will return the form with different text and different html structure — in this example the custom message is: "To view this password protected post, enter the password below:"
<?php
function my_password_form() {
    global $post;
    $label = 'pwbox-'.( empty( $post->ID ) ? rand() : $post->ID );
    $o = '<form action="' . esc_url( site_url( 'wp-login.php?action=postpass', 'login_post' ) ) . '" method="post">
    ' . __( "To view this protected post, enter the password below:" ) . '
    <label for="' . $label . '">' . __( "Password:" ) . ' </label><input name="post_password" id="' . $label . '" type="password" size="20" maxlength="20" /><input type="submit" name="Submit" value="' . esc_attr__( "Submit" ) . '" />
    </form>
    ';
    return $o;
}
add_filter( 'the_password_form', 'my_password_form' );
?>
Please note: the my_password_form function must return a value: don't use print or echo.
Make sure to set the maxlength parameter to a value of 20 when replacing the password protection form as WordPress will only save the first 20 characters due to database constraints.
The default Excerpt of a password-protected post is: "There is no excerpt because this is a protected post." This code will replace that text with your own — HTML allowed:
<?php
function my_excerpt_protected( $excerpt ) {
    if ( post_password_required() )
        $excerpt = '<em>[This is password-protected.]</em>';
    return $excerpt;
}
add_filter( 'the_excerpt', 'my_excerpt_protected' );
?>
Replace "<em>[This is password-protected.]</em>" with your custom password-protected Excerpt message.
Another option for your protected Excerpts is to print out the password form instead of the Excerpt message. That way people enter the password right from an index or archive page. Then, when they click the Title link, they'll see the Content. With the get_the_password_form function, you can make the password form be the Excerpt for a password-protected post:
<?php
function my_excerpt_password_form( $excerpt ) {
    if ( post_password_required() )
        $excerpt = get_the_password_form();
    return $excerpt;
}
add_filter( 'the_excerpt', 'my_excerpt_password_form' );
?>
This will get the default WordPress password form and text or any customizations you've made. For a better understanding of how post_password_required() and get_the_password_form() work, read their function definitions in wp-includes/post-template.php .
In this same WordPress core file you'll also find the the_excerpt and the_password_form filters, and the functions get_the_excerpt() , get_the_title() , and get_the_content() . These functions control how a post's title, excerpt and content display, depending on its visibility setting.
Hiding Password Protected Posts
Sometimes, you don't want your password protected posts to show up on other places around your site, like on the home page or archive pages. To effectively hide them from these pages without affecting your pagination, place the following code in your custom plugin file:
<?php
// Filter to hide protected posts
function exclude_protected($where) {
	global $wpdb;
	return $where .= " AND {$wpdb->posts}.post_password = '' ";
}
// Decide where to display them
function exclude_protected_action($query) {
	if( !is_single() && !is_page() && !is_admin() ) {
		add_filter( 'posts_where', 'exclude_protected' );
	}
}
// Action to queue the filter at the right time
add_action('pre_get_posts', 'exclude_protected_action');
?>
This code works in two parts: the first part effectively removes any password protected posts directly from any SQL query that WordPress is running, using the posts_where filter . The second part adds this filter to all pages except single posts, pages, and admin pages.
For more information on why pre_get_posts is the right action for this function, see the pre_get_posts action reference .
Changing the cookie lifetime
See https://developer.wordpress.org/reference/hooks/post_password_expires/