If you prefer to display all your content in a long one-page layout, KC Documenter provides just that with a scroll spy for easy navigation and dynamic search for filtering titles.
You can choose the articles you'd like to create a document from using the edit screen in the admin area. The order of the articles to be included is based on the drag and drop article list order.
Each document includes optional header and footer areas. The text for header and footer areas is entered in the document edit screen. We are using document header area for this instructional text.
If you used setup assistance during plugin activation, a page including the shortcode for Article Wall is created. If you did not, deactivate and reactivate the plugin to see setup assistance again or just include the following shortcode in a page:

<div >
<ul>
	<li><a href="<?php echo get_settings('home'); ?>">HOME</a></li>
	<li><a href="wordpress/recipes/">RECIPES</a></li>
	<li><a href="wordpress/travel/">TRAVEL</a></li>
	<li><a href="http://www.wordpress.org">WORDPRESS</a></li>
</ul>
</div>
<div >
<ul>
 <li><a href="<?php echo get_settings('home'); ?>">HOME</a></li>
<?php wp_list_categories('orderby=name&include=1,3,4,5'); ?>
 <li><a href="http://www.wordpress.org">WORDPRESS</a></li>
</ul>
</div>
#navmenu ul {margin: 0; padding: 0;
list-style-type: none; list-style-image: none; }#navmenu ul {margin: 0; padding: 0;
list-style-type: none; list-style-image: none; }
#navmenu li {display: inline; }#navmenu ul {margin: 0; padding: 0;
list-style-type: none; list-style-image: none; }
#navmenu li {display: inline; padding: 5px 20px 5px 20px}
#navmenu a {text-decoration:none; color: blue; }
#navmenu a:hover {color: purple; }#navmenu ul {margin: 0; padding: 0;
list-style-type: none; list-style-image: none; }
#navmenu li {display: inline; }
#navmenu ul li a {text-decoration:none; margin: 4px;
padding: 5px 20px 5px 20px; color: blue;
background: pink;}
#navmenu ul li a:hover {color: purple;
background: yellow; }
<p>Archives:<?php wp_get_archives('format=custom&show_post_count=1&type=yearly&after=;'); ?>
Categories:<?php echo str_replace('<br />',';', wp_list_categories('style=&show_count=1&echo=0'));?></p>

If you have set your WordPress site to display post excerpts on the front or home page, you will want visitors to click on the title or a link to encourage them to continue reading your post or article, right? WordPress makes this technique easy, and customizable.
Excerpts (teasers) can be shown on WordPress through two methods:
In both cases, if you have set anything in the Excerpt meta box on the post editor screen, that text will be used. Otherwise, the excerpt will be automatically trimmed.
The most commonly used method is the first one, because the user editing the post can choose between showing the whole content or just the excerpt, individually for each post. However, using the_excerpt() in your template file can also get a teaser from the first 55 words of the post content, without the need to place a more quicktag in the post.
To add a more quicktag in your post, put your cursor where you want to end the excerpted content of your post and click the more quicktag button.
quicktags are the little buttons found above the editing window in your Administration > Write > Post SubPanel. They include bold, italic, links, and others, and the famous more.
It will insert a code at that point that looks like this:
and I told him that he should get moving or I'd be
on him like a limpet.  He looked at me with shock on
his face and said
<!--more-->
The rest of the post continues, but when viewed on the non-single/non-permalink web page such as archives, categories, front page, and searches, the post is shown as an excerpt to the more point.
Users can then continue reading more as you have enticed them with your summary introduction, by clicking on a link to the full article. Themes usually include this link in the title and the above methods will generate it by default trailing your teaser, as the example below.
The parameters within the template tag the_content() are as follows:
<?php the_content( $more_link_text , $strip_teaser ); ?>
The $more_link_text sets the link text like "Read More". The second one, $strip_teaser, sets whether or not the "more" link should be hidden (TRUE) or displayed (FALSE). The default is FALSE, which shows the link text.
To remove the teaser:
the_content('',FALSE,'');By default, clicking the .more-link anchor opens the web document and scrolls the page to section of the document containing the named anchor (#more-000). This section is where writers choose to place the <!--more--> tag within a post type.
Users can prevent the scroll by filtering the content more link with a simple regular expression.
function remove_more_link_scroll( $link ) {
	$link = preg_replace( '|#more-[0-9]+|', '', $link );
	return $link;
}
add_filter( 'the_content_more_link', 'remove_more_link_scroll' );
Simply add the above code to the theme's functions.php file and the named anchors are no more.
Adding this code to your functions file enables you to customize the read more link text.
add_filter( 'the_content_more_link', 'modify_read_more_link' );
function modify_read_more_link() {
return '<a  href="' . get_permalink() . '">Your Read More Link Text</a>';
}
Code reference: https://developer.wordpress.org/reference/hooks/the_content_more_link/
Sometimes you can't afford adding a more quicktag to all your posts, so the only way to show an excerpt is modifying the template, changing the_content() to the_excerpt() but that will just show "[...]" at the end, not a "more…" link to the full post.
To show a "more" link, add the following code to your functions.php file.
// Replaces the excerpt "more" text by a link
function new_excerpt_more($more) {
       global $post;
	return '<a  href="'. get_permalink($post->ID) . '"> Read the full article...</a>';
}
add_filter('excerpt_more', 'new_excerpt_more');
If you are using a Child Theme , the above code will not work without modification if the parent theme has its own filters setting its own "more" link. You will need to use the remove_filter() function to remove the parent's filters for yours to work. The problem is your functions.php file is loaded before the parent's functions.php, so at the time of your file's execution, there is no filter to remove yet, and your remove_filter() code will fail without warning.
The key is to put your remove_filter() code in a function that executes from an action hook that triggers after the parent theme is loaded. The following code is an example of the additional code needed to get the above code to work from a child theme of the parent theme twentyeleven. You will need to examine your actual parent theme's code for the correct parameters in the remove_filter() code, they must exactly match the add_filter() parameters used by the parent.
function child_theme_setup() {
	// override parent theme's 'more' text for excerpts
	remove_filter( 'excerpt_more', 'twentyeleven_auto_excerpt_more' );
	remove_filter( 'get_the_excerpt', 'twentyeleven_custom_excerpt_more' );
}
add_action( 'after_setup_theme', 'child_theme_setup' );
Seeing that you know how it works, now look at how we can make this little invitation to continue reading your post be more inviting.
By design, the the_content() template tag includes a parameter for setting the text to be displayed in the the "more…" link which allows you to continue reading.
By default, it looks like this:
If you want to change the words from more.... to something else, just type in the new words into the tag:
<?php the_content('Read on...'); ?>Or get more sophisticated and make it fun:
<?php the_content('...on the edge of your seat? Click
here to solve the mystery.'); ?>
You can style the text in the tag, too.
<?php the_content('<span >...on the edge of
your seat? Click here to solve the mystery.</span>'); ?>
Then set the moretext class in your style.css style sheet to whatever you want. Here is an example of the style which features bold, italic text that is slightly smaller than the default text:
Some people do not want the text and prefer to use an extended character or HTML character entity to move the reader on to the full post.
<?php the_content('» » » »'); ?>Would look like this:
There is another parameter in the_content() template tag which will include the title of the post in the more text. Through the use of the_title() tag, the title of the article is included:
<?php the_content("...continue reading the story
called " . the_title('', '', false)); ?>Although the_content() is usually called from the template with a standard text as described above, it is possible to have an individual text for certain posts. In the visual editor, simply write <!--more Your custom text -->.
So, you may have something like this:
<!--more But wait, there's more! -->
The design possibilities with CSS are practically unlimited, and WordPress allows you to use images in many of their Template Tags , including the more tag. To add an image, there are two ways to do it. Begin with the most simple -- listing it in the_content() template tag.
This examples features the image of a leaf after the "Read More" text and assumes that the image file is within your theme's images folder.
<?php the_content('Read more...<img src="' . get_bloginfo('template_directory'). '/images/leaf.gif" alt="read more" title="Read more..." />'); ?>Notice that the code uses an ALT and TITLE in the image tag. This is in compliance with accessibility and web standards, since the image is both an image and a link. Here is what it might look like.
You could even add a style to the image and more tag, as mentioned above, to style it even more. To use the image without the "Read More" text, just delete the text.
The second example uses the CSS background image. We have described how to use style classes in the above examples. This is a little tricker. The container's style must be set to allow the background image to show out from behind the text. If you were to use the above example as a background image, the style.css style sheet for this might look like this:
.moretext {
   width: 100px;
   height: 45px;
   background:url(/images/leaf.gif) no-repeat right middle;
   padding: 10px 50px 15px 5px}
The 50px padding against the right margin should make sure the text is pushed over away from the image as to not overlap it. The height ensures that the container will expand wide enough so the image is visible within the container, since a background image isn't "really there" and can not push against the container's borders. You may have to experiment with this to fit the size and shape of your own image.
You have gotten the basics. From here, it is up to your imagination.
Please remember that the "Read More" tag is used only on the Home page which shows the latest posts. It does not work in " Pages ". If you want to turn it on in Pages too for showing a set of partial posts, use the following code inside the loop for the dynamic content:
<?php
global $more;
$more = 0;
?>
//The code must be inserted ahead of the call the_content, but AFTER the_post()
<?php the_content('Continue Reading'); ?>
It's important that if you're going to over-ride the default $more global variable you do it inside The Loop, but after your setup the post. If you're working with the standard Loop and using the_post(), make sure you set $more after the_post (but before the_content().
See More tag ignored on static front page forum topic.
If you set the $more variable to -1, the More tag will not be displayed. This can be useful in a "mullet loop". Like this:
<?php global $more; $more = -1; //declare and set $more before The Loop ?>
<?php if (have_posts()) : while (have_posts()) : the_post(); //begin The Loop ?>
<?php
    if ($more == -1) { //do not use the more tag on the first one.
        the_content();
        $more = 0; //prevent this from happening again. use the more tag from now on.
    }
    else { //use the more tag
        the_content(__('Read more...'));
    }
?>
<?php endwhile; //end of The Loop ?>

They say you can not judge a book by its cover, and yet every day people do. They pick up a book, look at the cover, and then are moved to either put it down, turn it over, or open it up just because of how the cover looks. Websites are also judged by their covers and the first impression often comes from the header.
The header of your site is typically the first thing people see. From this masthead or header art across the top of your page, people make sweeping judgements about what they are about to see and read. The same people who say you can not judge a book by its cover, also say that you only have 30 seconds to make a good impression. In the world of the Internet where the next web page is a click away, you have much less than that.
We are going to take you inside the architecture of a WordPress header and offer tips on how to customize it to become your own book cover, enticing people into your site with a good first impression. Then we will offer some tips from some experts on what makes a good website header.
By default, the WordPress header is a simple piece of code. You do not have to get into the code to change the header that comes with whatever WordPress Theme you choose. You set the blog or website title and description in the Administration > Settings > General panel, and WordPress does the rest.
In its simplest form, the WordPress Classic Theme features the header code like this in the wp-content/themes/classic/header.php template file:
<h1 >
<a href="<?php bloginfo('url'); ?>"><?php bloginfo('name'); ?></a>
</h1>
The header is set in an h1 HTML tag and features one template tag used with two different options or parameters. You can learn more about these parameters in the documentation for bloginfo() . Basically, the first one displays the URL of the website in a link, and the second one displays the name of the blog or website as set in the Administration > Settings > General panel. When the user moves the mouse over the header title, the header can be clicked to return back to the main or front page of the site as set in the Administration > Settings > General panel.
The WordPress Default Theme features an image in the background and presents the header like this in wp-content/themes/default/header.php:
<div >
 <div >
   <h1>
    <a href="<?php echo get_option('home'); ?>">
       <?php bloginfo('name'); ?></a>
   </h1>
     <div >
       <?php bloginfo('description'); ?>
     </div>
  </div>
</div>
Again, the template tag featuring the name of the blog or website is in a link, but this shows another usage similar to the URL request above. It gets the same information, just in a different way. It also adds the description of the site from the Administration > Settings > General panel.
Basically, these two header examples do the same thing in different ways. They provide information in the header, with the potential for an image, and make the header title clickable to help navigation on the site. It is just a matter of how much information you want in your header, and how that information is displayed.
Using the first example from the Classic Theme, an image can still be used in the background, set within the style sheet in the h1 selector, but the second one gives more control to the use of an image in the header by giving it its own division. How these look are totally controlled by the style sheet.
As listed in the two above examples, the styles for the header are contained within the h1, header, headerimg, and description CSS selectors. These are all found within the style.css, though may be found in the styles in the header.php of the Theme you are using. You will have to check both places.
In the Classic Theme, the CSS for the header are found in one selector, the #header.
#header {
	background: #90a090;
	border-bottom: double 3px #aba;
	border-left: solid 1px #9a9;
	border-right: solid 1px #565;
	border-top: solid 1px #9a9;
	font: italic normal 230% 'Times New Roman', Times, serif;
	letter-spacing: 0.2em;
	margin: 0;
	padding: 15px 10px 15px 60px;
}
The background color is set to a green shade and there is a border all the way around the header which changes colors creating a recessed, shadow effect. The Times font is set with a size of 230% with a wider than normal letter spacing. The padding on the left side indents the text in from the left.
All of these can be easily changed, giving the border a thicker width and making it all the same color, changing the background color, the font size and style, the letter spacing, and more by modifying the information in each style attribute.
The same is true of the Default WordPress Theme header, except there are more styles to think about and they are found within the header.php's "head" tag and the style.css, though once you have your styles set, you can move the information into your style sheet.
The styles that control the header's look are found within the h1, header, headerimg, and description CSS selectors. Just like the Classic Theme, find these references and make your modifications there to change the look.
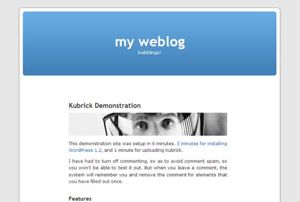
Changing the header image of the Default WordPress Theme has been simplified with the introduction of a utility called Kubrickr . It simply asks you to supply a new image file name for the header and then switches it for you, so you do not have to dig into the code. If all you want to change is the header image, this is an extremely useful and easy tool.
If you do want to get your hands into the code, dig into your header styles and make the changes. Below is a simple tutorial on changing just the header image manually.
There are many different header images and header art available for you to use to change the image in the header. The styles for the header image for the Default or Kubrick WordPress Theme, and any Theme based upon that Theme, are more complicated to change than those for the Classic Theme. The styles are found within the styles in the header.php "head" section, as well as in the styles.css. To change only the header image reference, open the header.php template file and look for the styles like this:
#header {
  background: url("<?php bloginfo('stylesheet_directory'); ?>/images/wc_header.jpg")
  no-repeat bottom center; }
#headerimg  {
  margin: 7px 9px 0;
  height: 192px;
width: 740px; }To change the image file, replace the "kubrickheader.jpg" with the name of the new graphic image you have uploaded to your site to replace it. If it is in a different directory, change that by replacing the bloginfo() tag with the specific address of the graphic's location.
If you are using an image that is the same size, then simply replace the image. If it is a different size, fill in the height and width of the image in the next section called #headerimg. If you do not know, and are using Windows, view the folder in which the image resides on your computer in Thumbnail view mode. Click View > Thumbnail from the Windows Explorer menu. In Thumbnail view mode, find your image and hold the mouse over it. A small balloon tip will pop up listing the dimensions. Use that information in the styles. Otherwise, just right click on the image file and choose Properties and it should give you the file size and dimensions.
Save the template file and upload it and the image to your website and take a look . Some changes may need to be made to fine-tune the placement and look.
With the header image in place, it is time to tackle the rest of the header. Open your style.css style sheet file and look for the following:
Your Theme may or may not have all of these, but the Default Theme has all of them in different places within the style sheet. All or some of these may need to have the attributes changed to change the look of your header.
If you change the size of the header image or header art, be sure and change the other structural CSS selectors like content and sidebar to accommodate the change in the header size.
A header image that fits within the Default WordPress Theme is about 192 x 740 pixels. If you are replacing the header within any WordPress Theme, check the size of the header image and then find a replacement that matches that size. If you choose a header image that is smaller or wider or taller than the replacement, you may have to modify the other structural elements of the web page to allow for the change in size of the header.
If you are modifying the entire site's Theme, the width of the overall page or content area needs to be taken into consideration for the header image's size. The two most common screen sizes are 1024x768 and 800x600 pixels. Yet, wide screen monitors are gaining ground and web designers now need to prepare for screen widths of 1280x1024 and 1600x1200.
If you set your website to "float," positioned in the middle of the browser window with space on either side, then you can set your header width to whatever you want. If you are designing a Theme with a flexible or "elastic" screen width, then the width of your header becomes important.
If you are using a header image that can be repeated, and you are using elastic widths, you can set the styles within the header to repeat to fill the space:
#header {
background: url("/images/kubrickheader.jpg")
repeat-x top left; }
This sets the header image to repeat horizontally beginning from the top left corner and going across. You can adjust these to whatever background position your header design and layout needs.
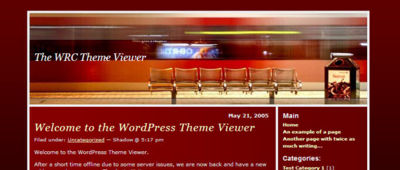
A new term growing in the web design field is header art. These are header images that are usually handmade using combinations of color, shapes, symbols, images, and text. They can take some time and labor to create. While there are some free header art sites , some sites sell their handmade header art. Although a photograph may be unique in its own way and convey the needed visual style, handmade header artwork is easier to match to other web page colors and is usually more aesthetically pleasing because of its distinctive nature.
Choosing pre-made header art has some benefits. The artists have already done the work and all you have to do is choose the design that best matches your website. And the graphic is ready to use, already sized and saved as a small file size.
Digital Westex's WordPress Header Art features a wide range of header art sized and ready for free download specifically for WordPress.
The best header art to use, if you do not want to generate your own, is any that bear the Creative Commons License that specifically allows its public use. Read the individual license for the image's use to make sure that you have permission to use the header art on your site. Usually you must attribute the author, share alike and not use it for commercial purposes. If in doubt, always ask permission from the author before use.
As header art is made and licensed "as is" by the designer/artist, some header art cannot be modified without the artist's permission. Check the website copyrights and licenses and ask if you are in doubt and wish to modify the artwork.
You can also design your own header art. Any graphic design software program will work. Popular ones include Adobe Photoshop, Adobe Elements, JASC PaintShop Pro, The Gimp and Macromedia Fireworks. The graphic design software should have the ability to resize and control the resolution and type of the image when saved. The size of your header art should be the size of the header container you're going to put it in.
You can use your own photographs, artwork, fonts, and any combination of images to create your header art. When done, save it "for the web" as a jpg, gif, or .png file. For an explanation on which to use read Sitepoint's GIF-JPG-PNG What's the Difference article. These file types will compress the image's resolution, reducing the file's size. In general, avoid file sizes larger than 50K as larger sizes tend to slow a site access times.
Many Themes and Theme designers want to feature their header with a picture only, no text. Some will put the text in the graphic image, therefore not requiring the actual use of the text. One option is to remove the template tags that generate the title and description. The other option is to leave it in, but hide it.
To hide the header text while leaving it in the code, do not change anything in your template files. Only change the CSS. Add display:none to the CSS selectors you do not want to appear. For example, to hide the text within the h1 selector:
h1 {display:none; font-size: 230%; color: blue;.......It is still there, but the browser has been commanded to not show it in any way. The container literally is "not there."
It might be hidden, but some web page screen readers and search engines will still find the information. If you are serious about making your site be accessible, some newer text readers access the style sheet and do not read the elements marked display:none. There are two popular methods for working around this. One is to use the display:none as outlined above, but also include an aural style sheet that changes that selector to display:block, "turning the visibility" back on. The other method is to position the content literally "off the page" by a negative indent. Here is an example:
h1 {
   font-size: 0;
   text-indent: -1000px; }
This technique moves the entire h1 tag and its contents physically off the web page. The screen reader will still "read" the text because it is there, but it will not display on the page. Extensive testing has proven so far that this technique works across most browsers and with all screen readers.
For more information on either technique and aural style sheets:
To make the entire header, graphic and all, clickable, you must put the header graphic inside of a link. There are two ways to do this. You can put the graphic directly into the WordPress Theme manually, or you can use the stylesheet to define the link size area to encompass the header art area.
To make the header art clickable by embedding it into the header, in the wp-content/themes/classic/header.php template file of your WordPress Theme, change the following:
<div >
     <h1><a href="<?php bloginfo('url'); ?>/">
     <?php bloginfo('name'); ?></a>
</h1>
</div>
to this code snippet:
  <div >
    <a href="<?php bloginfo('url'); ?>">
  <img src="http://example.com/headerimage.jpg" alt="<?php bloginfo('name'); ?>" />
    </a>
     <h1><a href="<?php bloginfo('url'); ?>">" title="<?php bloginfo('name'); ?>">
         <?php bloginfo('name'); ?></a>
     </h1>
You can style the h1 heading to overlap or sit below, or not even be visible in the header.
To make the overall area of the header clickable, the header must have a width area set for the h1 anchor HTML tag to make the clickable area cover the header image in the background. The styles are set in the stylesheet.
The HTML and WordPress Template Tags look like this, the same as above:
<pre><div >
     <h1><a href="<?php bloginfo('url'); ?>/">
     <?php bloginfo('name'); ?></a>
</h1>
</div>
The CSS would then be styled something like this to enlarge the clickable link area and hide the header text (optional), customized to your own design needs.
#header h1 a {
	width: 400px;
	height: 100px;
	display: block;
	background: url(images/headerimage.gif) no-repeat top left;
	}
#header h1 a span { display: none; }
Another option is to add a script to make the header section clickable, which may not work for all browsers. This is showcased in the Default WordPress Theme (Kubrick) with its clickable header:
<div onclick="location.href='http://example.com/';" style="cursor: pointer;">
If you want both text areas of the header to be clickable and not the entire header image, use the following to make the header art and the blog title and description clickable.
<div >
 <div >
   <h1>
     <a href="<?php echo get_option('home'); ?>">
       <?php bloginfo('name'); ?>
     </a>
   </h1>
 <div >
   <a href="<?php echo get_option('home'); ?>">
     <?php bloginfo('description'); ?>
   </a>
  </div>
 </div>
</div>
There are several scripts available that will allow you to rotate images within the header, sidebar, or on any template file. We will examine the use of one of these, the Random Image Rotator .
Save the script to a separate folder in which you have the header images you wish to rotate in your header. For this example, call it rotate.php. To use this as a background image that changes or rotates with every load of the web page:
#header {
background: url("/images/headerimgs/rotate.php")
no-repeat bottom center; }
To actually put this in your header, or elsewhere on your site, add an image link like this within the header division:
<img src="https://codex.wordpress.org/images/headerimgs/rotate.php" alt="A Random Header Image" />
Image rotating scripts include:
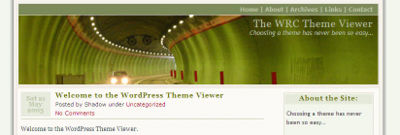
Headers are another area where you can add navigation elements to your website. Typically these are horizontal menus at the top or bottom of your header. To add these, create a new division within the header to style your header navigation elements.
This can be as simple as displaying your categories across the top of the header using one of the List Categories template tags . Let us look at one example using the list_cats() tag.
In this example, the list_cats() template tag is set to sort the list of categories by ID in an unordered list (<ul><li>) without dates or post counts, does not hide empty categories, uses category "description" for the title in the links, does not show the children of the parent categories, and excludes categories 1 and 33. It sits in its own "category" division. Notice that a link to the "home" page or front page has been included manually at the start of the list.
<div >
<div >
<ul><li>
<a title="Home Page" href="index.php">HOME</a></li>
<?php list_cats(FALSE, '', 'ID', 'asc', '', TRUE, FALSE,
FALSE, FALSE, TRUE, FALSE, FALSE, '', FALSE,
'', '', '1,33', TRUE); ?>
</ul>
</div><!-- end of categorylist -->
<h1><a href="<?php bloginfo('url'); ?>"><?php bloginfo('name'); ?></a></h1>
</div><!-- end of header -->
To style this list, the #categorylist in the style.css might be:
#categorylist {font-size:12px; font-style:normal;
        text-transform:uppercase; }
#categorylist ul {list-style-type: none; list-style-image:none;
        margin:0; padding-bottom: 20px; }
#categorylist li { display: inline; padding: 0px 5px;}
#categorylist a:link, #category a:visited {color:blue}
#categorylist a:hover {color:red}
It might look like this:
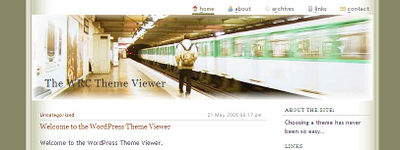
You can also add your Pages , archives, and other links within your header navigation. For more information on navigation menus:
Here are some tips and information to help you choose and customize your WordPress site's header.
Many WordPress Themes come with header image graphics you can use because they are released for free use under the GPL - General Public License . Or you can use one of the many resources available for free on the Internet, or design your own.
Here are a few resources for header images: